
The rendering engine is the set of algorithms that transform the data of the 3D scene (models, materials, lighting, etc.) into bitmap/raster images called renders. Digital images have a color depth expressed in bits per pixel (bpp) and calculated as a power of two. With Blender, we can use the classic Truecolor color depth of 24 bits, that is 2 raised to the twenty-fourth power (2²⁴) equivalent to a palette of 16,777,216 colors, or push ourselves to a depth of 48 bits. To handle such a large number of colors, it is necessary to adopt a mathematical model that describes each single shade through three coordinates, somewhat like determining the position of geometric points in 3D space. The color model used in computer graphics is RGB (Red, Green, and Blue) directly inspired by the physiology of human vision itself. The graphics hardware will use a Color Space since it will have to transform the color model (abstract entity) into images that are correctly perceivable through a monitor. The color space that interests us is sRGB, which you will find set by default in the rendering properties context

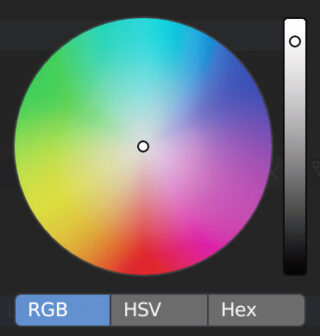
The color depth for each of the three components can be 8 or 16 bits, in the first case (the most common) we have 256 levels respectively between black and Red/Green/Blue (256x256x256 is exactly 224). Blender allows you to define colors in three different ways:
- Through RGB components
- Through HSV components (Hue, Saturation, Value)
- Through hexadecimal string HEX (a sort of address that uniquely identifies the color).
All of this simply using an intuitive palette called the color wheel, which we will have the opportunity to delve into later.
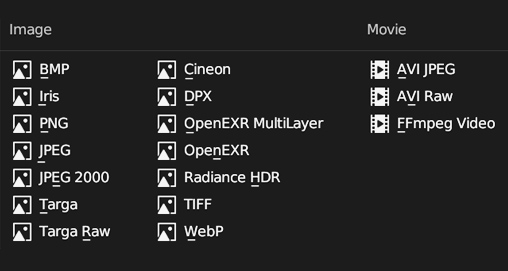
To be precise, we will be dealing with RGBA images and not RGB, that is, with the additional Alpha channel dedicated to the transparency of the pixel. Once we have obtained our render (F12 button or Render>Render Image), we will save it to the hard drive by choosing the format in the Output context of the properties, icon ![]() here we find various graphic formats divided into:
here we find various graphic formats divided into:
- Uncompressed (bmp)
- Lossless compressed (png)
- Lossy compressed (jpeg)
- That support the alpha channel (Png, Targa, Tiff)
as well as other special formats such as Radiance HDR, which we will encounter in paragraph 4.5.
The 16-bit color depth per channel (available in png and tiff formats) is useful to avoid data loss during hardware conversions and in the eventual post-processing phase of our renders, but there is a limit regarding human perception of colors that has actually made truecolor the standard in monitor construction (the market today offers models with a higher depth, also used in the gaming sector). In cases where the color depth shows some limitations, especially in truecolor images with a dominant hue, the dithering technique (par 5.2) combined with high resolutions will perfectly deceive the eye.
Regardless of the chosen graphics engine, Blender first needs the scene to have at least one camera object. The camera (optical instrument) is the tool created to capture images from the visible spectrum thanks to the physical interaction between the light rays that reach the lens and then the film (or the semiconductor sensors of the digital age). In Blender, we find the Object Camera, represented in the 3D View by a pyramid with a square base with a triangle that can be solid or empty.
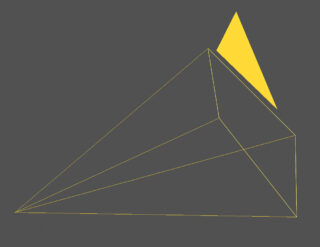
In any scene we can insert as many cameras as we want, but only one of them will be the active one (marked by the solid triangle) and the rendering will start from its point of view, which will obviously be influenced by the settings chosen for the camera. Any camera can be made active by selecting it and pressing Ctrl-0 on the numeric keypad. The camera settings can be found in the Object Data properties context, under the ![]() icon, a topic that we will have the opportunity to delve into further later. For now, let’s focus on the differences and similarities between the two types of rendering in Blender: Eevee and Cycles. The first is a PBR (Physically Based Rendering) 3D engine that aims for a good balance between realism and speed thanks to mathematical models designed to efficiently simulate lighting on any type of surface (opaque, semi-transparent, reflective, etc). With Eevee, the calculation of a single frame can take a fraction of a second (3D real-time animations) up to several minutes, depending on the degree of precision set for rendering, the complexity of the various models and their materials, and of course the resolution chosen for our renders. The set of necessary calculations is entirely performed by the GPU, similar to what happens with the well-known commercial engines UE4 or Unity, both of which are also PBR. During the long development of Blender 2.8 (countless alpha and beta releases), Eevee convinced users and developers that it could become more than just a real-time preview to be used alongside Cycles, and today in the 2.9x releases it presents itself as an engine with which it is possible to render all those projects that do not require an exact simulation of the physical behavior of light, but a roughly realistic final rendering (render above). Eevee and Cycles use the same Shading system derived from the common PBR approach. The shader’s job is to simulate the effects of direct lighting based on the parameters chosen for the surface of the model, such as diffuse reflection or more detailed settings such as the presence of roughness or reliefs, possibly using particular textures. The similarities between the two engines actually end here, because Cycles not only processes the direct lighting coming from light sources, but also that resulting from the bouncing of light rays (indirect lighting), that is, a Global Illumination engine. Considering the enormous technological difference between Eevee and Cycles, it is completely useless to proceed with a direct comparison through renderings. If, as mentioned, Eevee helps save time with a rendering that is often satisfying but not entirely realistic, Cycles maximizes the hardware power of our PC in order to achieve true photorealism, obviously with considerably longer processing times. However, be careful, in 3D rendering photorealism is never the result of the work of algorithms alone, it requires careful study of lighting and materials, as well as some experience and a well-trained eye. In this chapter we will deal with Eevee, set as the default engine, after which the switch to Cycles will be completely natural and painless.
icon, a topic that we will have the opportunity to delve into further later. For now, let’s focus on the differences and similarities between the two types of rendering in Blender: Eevee and Cycles. The first is a PBR (Physically Based Rendering) 3D engine that aims for a good balance between realism and speed thanks to mathematical models designed to efficiently simulate lighting on any type of surface (opaque, semi-transparent, reflective, etc). With Eevee, the calculation of a single frame can take a fraction of a second (3D real-time animations) up to several minutes, depending on the degree of precision set for rendering, the complexity of the various models and their materials, and of course the resolution chosen for our renders. The set of necessary calculations is entirely performed by the GPU, similar to what happens with the well-known commercial engines UE4 or Unity, both of which are also PBR. During the long development of Blender 2.8 (countless alpha and beta releases), Eevee convinced users and developers that it could become more than just a real-time preview to be used alongside Cycles, and today in the 2.9x releases it presents itself as an engine with which it is possible to render all those projects that do not require an exact simulation of the physical behavior of light, but a roughly realistic final rendering (render above). Eevee and Cycles use the same Shading system derived from the common PBR approach. The shader’s job is to simulate the effects of direct lighting based on the parameters chosen for the surface of the model, such as diffuse reflection or more detailed settings such as the presence of roughness or reliefs, possibly using particular textures. The similarities between the two engines actually end here, because Cycles not only processes the direct lighting coming from light sources, but also that resulting from the bouncing of light rays (indirect lighting), that is, a Global Illumination engine. Considering the enormous technological difference between Eevee and Cycles, it is completely useless to proceed with a direct comparison through renderings. If, as mentioned, Eevee helps save time with a rendering that is often satisfying but not entirely realistic, Cycles maximizes the hardware power of our PC in order to achieve true photorealism, obviously with considerably longer processing times. However, be careful, in 3D rendering photorealism is never the result of the work of algorithms alone, it requires careful study of lighting and materials, as well as some experience and a well-trained eye. In this chapter we will deal with Eevee, set as the default engine, after which the switch to Cycles will be completely natural and painless.
Next paragraph
Previous paragraph
Back to Index
Wishing you an enjoyable and productive study with Blender, I would like to remind you that you can support this project in two ways: by making a small donation through PayPal or by purchasing the professionally formatted and optimized for tablet viewing PDF version on Lulu.com